Showing posts with label Tutorial. Show all posts

Saturday, June 10, 2017

Wonky Stars Tutorial

     A friend asked how I made my wonky stars so decided to share a tutorial.  I really enjoy making them in all sizes, colors and settings.

     I was first introduced to similar stars in Bonnie Hunter’s Crumb Workshop where she taught Maverick Stars.  Since then I have seen other similar stars called Wonky Stars.
You may want to check out :
Elizabeth Hartman’s Sparkle Punch quilt 
SewMamaSew blog  tutorial 
You can watch Jenny at Missouri Star Quilts on YouTube.  

Following is my preferred method.

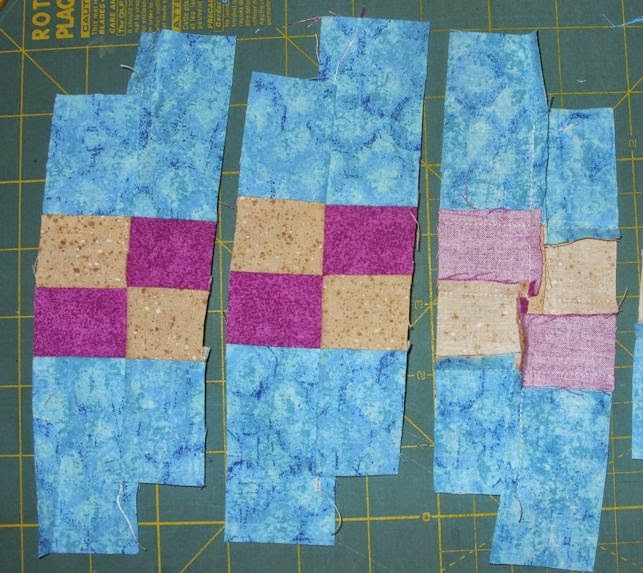
     I begin with 8 squares of consistent size and value plus 5 of the same size and opposite value. (either with light or dark stars.)


Of the 5, leave one alone and cut the other 4 diagonally into triangles. (You can use scrap triangles instead.)  Layout the 8 similar squares as you would a 9 patch with the opposite value in the center. 


    Work with the middle square on each side of the nine patch to sew the star points. 

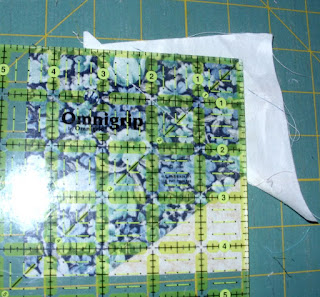
Lay a triangle RST onto the square so that at least ¼” inch is off one edge and the other about in the middle of the adjacent side. The star point can be tall, thin, short or fat depending on how “wonky” you want your stars.  Sew about ¼” along the edge of the triangle.


Press out and trim to match the square. Then trim away behind the triangle.


Next sew a triangle onto the opposite side of the square and about the middle of the adjacent side covering the previous triangle seam by about ¼”.


Press out and trim to match the square. Then trim away behind the triangle. Repeat for all 4 units.


Now you can lay out as a nine patch and sew 


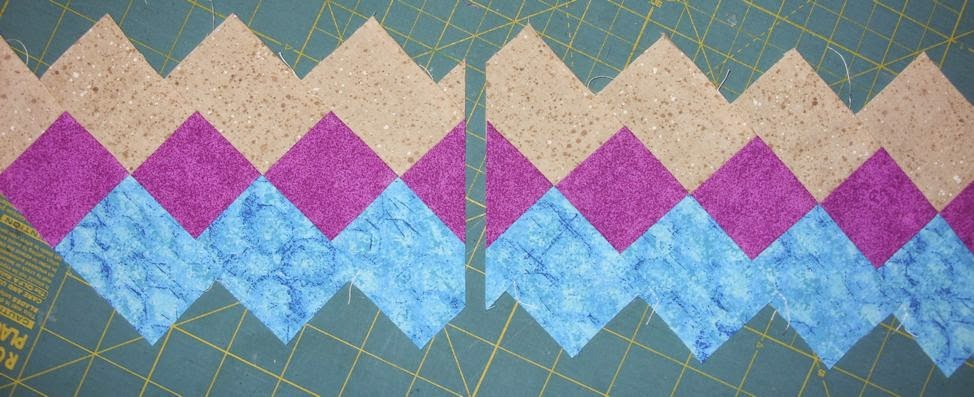
OR  the stars can be offset in 16 patch for a floating setting


OR wait … if you want the stars points to float with other stars.  For the following setting, the star units are constructed separately and sewn in rows after the layout is determined.
 

I hope you will give the Wonky Stars a try.

Enjoy.

Tuesday, September 9, 2014

Harlequin Seminole Band


1.     Cut strips.         2 ”  fabric A background
                          1 ½ ”    fabric B
                          1 ½ ”    fabric C
                         3 ”  fabric A background

2.    Sew the strip set with shortened stitch length since we will be slicing the seams into sections.

3.    Finger press seams A towards B, B towards C and C towards A.  (As a general rule, press strips to reduce bulk and allow for nesting seams.) Press bands gently from the right side, with enough pressure to flatten, but without stretching any bias edges.

4.    Cut pieces into 1 ½ ” segments.

5.    Pair segments, flip one and align pairs, nesting B and C.  Sew together pairs. 

                        
6.    Next align sets so the bottom seams of C nest.  Sew together. 


7.    Once the band is sewn together, turn it on its side so that the squares stand up on point.  At both ends add a 4 ½” half-square triangle of the spacer fabric to each end. 


8.    Trim edges leaving a seam allowance.  Band will finish at 3" high.


For narrow band to finish at 1 3/4” high, use fabric strips as follows:
  1 1/4 ”    WOF or half   fabric A
                                        1 ”    WOF or half   fabric B
     1 ”    WOF or half   fabric C
                                     1 3/4”     WOF or half    fabric A

Monday, September 8, 2014

Simple Seminole Band Tutorial

After a couple of hours of FMQ, I wanted to do some different sewing for a while.  My church quilt  group is planning to try some Seminole Piecing for our Wednesday meeting so I decided to try some.  I wrote up some instructions for 2 simple bands.

Simple Stairstep


1.     Cut strips.         2 ½” WOF or half  fabric A 
                          2”    WOF or half   fabric B
                          2 ½” WOF or half   fabric C

2.    Sew the strip set with shortened stitch length since we will be slicing the seams into sections.

3.    Press seams toward center strip.  (As a general rule, press strips to reduce bulk and allow for nesting seams.) Press bands gently from the right side, with enough pressure to flatten, but without stretching any bias edges.

4.    Cut pieces into 2” segments.

5.    Align the pieces in steps (seams should nest) and sew together. 

6.    Once the stairstep band is sewn together, turn it on its side so that the squares stand up on point.  At both ends there will be wasted angled pieces.  To maximize the usable band area, make a single slice straight up and down anywhere in the band.  Now match and sew the two angled edges together.


Another option that avoids the uneven look the first option causes.
Rather than slicing and transferring, simply add a large half-square triangle of the spacer fabric to each end. 

7.    Trim edges leaving a seam allowance.  Finishes at 2" high  finished or 2 1/2" to float depending on how closely you trim.

Carefully press bands gently from the right side, with enough pressure to flatten, but without stretching any bias edges.

For narrow band to finish at 1 ¼” high, use fabric strips as follows:
                             1 ½”   WOF or half   fabric A
                 1 ¼ ”    WOF or half   fabric B

                 1 ½”  WOF or half     fabric C


I hope you will try some Seminole bands.  I plan to add instructions for another band tomorrow and then photos from our Wednesday work.  


Saturday, April 13, 2013

Making an Adult Bib


    For several years while my mother was in assisted living, she made and sold many adult bibs to other residents.  I recently had a request to make some.  I have on old one of hers to go by but that was not enough information.  I learned some helpful hints from my sister who had made some so I decided to write up the directions to help others in the future.

 We used a kitchen towel.  It is better if any design is one way. You also need about 1 ½” of Velcro and extra wide double fold bias tape which finishes about ½” wide.

About an 1 ½” down from the center top draw a 6” diameter circle.  ( I traced a Cool Whip lid) 
Stay stitch about 1/8” to ¼” outside the drawn circle. 
For the neck opening cut straight down the center top to the circle and then cut out the circle on the line. 
Sew bias tape to the wrong side of the towel around the cut edge.
Turn the bias tape to the front and top-stitch down.
Add Velcro to the neck opening.
Now you have an adult bib.