Showing posts with label Wonky Stars. Show all posts

Friday, January 10, 2020

Starting off 2020


    As the new year began I took time to make a list of projects I want to complete. It is a mix with some WIP (works in progress), a few are long time UFOs, a couple of dream quilts, and some charity/comfort quilts and QOV (quilts of valor). I have 20 quilts so far on my list. There will surely be some added and some pushed on to the back burner but at least I have a guide for the year.

     Wednesday at church sew day, I sandwiched a top for quilting and gathered backing pieces for a child's comfort quilt. At home I decided to catch up on piecing for the Seeing Stars Sew Along. I like Diane's concept of piecing panels made from a variety of blocks.  


You make the number of panels for the size quilt you want. I am working on a twin size quilt which needs 12 panels. Thursday I finished piecing the geese units for step 5. She gives you options, but I did not get creative for this step and only made geese units.


     Next I pulled units of a WIP and this is how far I got yesterday. About half the big blocks were left over from my Rainbow Scrap quilts year before last. Instead of making a lap quilt, I made some more blocks so they will make a full size bed quilt with borders. The first border will finish the stars.  

Have a great weekend and maybe enjoy some time sewing and quilting.

I have linked up with Whoop Whoop Friday so stop by and see what others are doing. 

Wednesday, October 31, 2018

Another UFO Off the List


     Just in time for the end of the month I am happy to say that the Rainbow Wonky Star quilt is a FINISH.  The blocks were made as part of the 2017 Rainbow Challenge with a different color each month.  I am proud that the entire quilt was made from my stash.

The blocks are quilted with a simple FM meander.  I changed thread color and quilted a special motif in each star. 
I quilted Lazy Eights (aka Wish Bones) in the sashing and border.


     Son 2 and I tried out a recipe and technique from Food Wishes for Pig in a Pumpkin.  The pork was baked inside the pumpkin. It was very tasty and I would do it again.  


       GDs are ready for Halloween.  They spent one afternoon helping with jack-o-lanterns.  They designed and cleaned out while their dad did the carving.


Happy Safe Halloween.
If you don’t celebrate, I hope you enjoy some time sewing or quilting.


I'm linking up with Whoop Whoop Friday and what many quilters are doing.
Also linking up with SoScrappy UFO Challenge.

Friday, February 9, 2018

A Pieced Top and a Comfort Quilt Finish

      I feel a lot has been accomplished this week.  I added a 6” border of  3 ½” by 6 ½” strips to the Scrap Dance Waltz blocks.  The blocks are from a mystery with From My Carolina Home blog.  (She is starting a new free mystery if you are interested.) Right now the top is 60 by 75” which would be a great adult throw size quilt. I considered whether to add more borders to make it full bed size.  However, I think I need to quilt it and get this UFO finished. 


     I never shared the finished quilting on my hexagon table topper quilt.  I finished it pillowcase style so no binding. 
Here is a view of the quilting on the back.


     I added the binding to the Four Patch Change Up quilt so it is totally finished and ready to donate. Most of the small 4 patches started leader/ender from scraps and this quilt just developed. 


    I pulled out Rainbow Wonky Stars UFO to work on and have a layout.  One problem is the pink blocks on the bottom. To rotate them like I want the same fabrics are too close. I may have rip some and replace a piece or two.  The very light red corner may also need some work.


    One afternoon I made a Valentine mug rug to send to a friend.


Hope you are enjoying some time for sewing or quilting.

I linked up with Confessions of a Fabric Addict.  Check out what others are doing.  

Friday, June 16, 2017

Quilting in Progress


     This week I did in-the-ditch stabilizing quilting on the dog quilt


... and a red version “Star Gazing” comfort quilt.  I used fat quarters from our church donated stash so there are a couple more colors.  You can find out more about the “Star Gazing” pattern in this post 

  
 Those 2 are ready for free-motion quilting; however, I have not started that.

     Wednesday at church sew day I sandwiched a wonky star comfort quilt so I have plenty to quilt on. 


Check out my Wonky Star tutorial if you have not tried them.  

     Next week I will spend another week with granddaughters.  I expect to do some sewing but no quilting.

Hope you get to enjoy some sewing or quilting time.


Saturday, June 10, 2017

Wonky Stars Tutorial

     A friend asked how I made my wonky stars so decided to share a tutorial.  I really enjoy making them in all sizes, colors and settings.

     I was first introduced to similar stars in Bonnie Hunter’s Crumb Workshop where she taught Maverick Stars.  Since then I have seen other similar stars called Wonky Stars.
You may want to check out :
Elizabeth Hartman’s Sparkle Punch quilt 
SewMamaSew blog  tutorial 
You can watch Jenny at Missouri Star Quilts on YouTube.  

Following is my preferred method.

     I begin with 8 squares of consistent size and value plus 5 of the same size and opposite value. (either with light or dark stars.)


Of the 5, leave one alone and cut the other 4 diagonally into triangles. (You can use scrap triangles instead.)  Layout the 8 similar squares as you would a 9 patch with the opposite value in the center. 


    Work with the middle square on each side of the nine patch to sew the star points. 

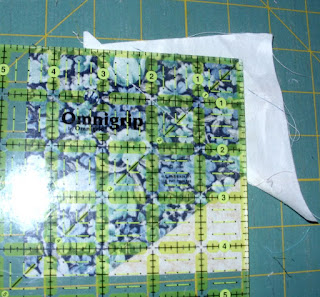
Lay a triangle RST onto the square so that at least ¼” inch is off one edge and the other about in the middle of the adjacent side. The star point can be tall, thin, short or fat depending on how “wonky” you want your stars.  Sew about ¼” along the edge of the triangle.


Press out and trim to match the square. Then trim away behind the triangle.


Next sew a triangle onto the opposite side of the square and about the middle of the adjacent side covering the previous triangle seam by about ¼”.


Press out and trim to match the square. Then trim away behind the triangle. Repeat for all 4 units.


Now you can lay out as a nine patch and sew 


OR  the stars can be offset in 16 patch for a floating setting


OR wait … if you want the stars points to float with other stars.  For the following setting, the star units are constructed separately and sewn in rows after the layout is determined.
 

I hope you will give the Wonky Stars a try.

Enjoy.