Friday, September 26, 2014

Saving Water Soluble Stablizer for Machine Embroidery

     This week has really flown by with Comfort Sew day Tuesday for GC Quild and I substituted for the beginning sewing teacher at MTC.  Wednesday my church quilt group met to work.  Members were working on a variety of different projects.  I put the Indian applique blocks on the design wall and pieced one Seminole block with 2 fancy strips and several plain spacer strips.
It is going to look great.

     Today I finished making a Georgia cheerleader outfit for my granddaughter’s Halloween costume this year.  

      Since I had my embroidery module attached to do the Georgia G, I decided to do more machine embroidery.  For several years I have had a set of tan napkins waiting for embroidery.  I used water soluble stabilizer, but to save, I pieced scraps.  
          Here are the holes left on a used piece. 

Next I place pieces between parchment paper and iron to set the pieces together. 

After it cools, I have another usable piece of stabilizer. 

     I embroidered the leaf motif on 10 napkins in 4 fall colors so instead of using 10 sheets of stablizer, I was able to recycle and reuse 3 or 4 sheets. 


Monday, September 22, 2014

Winning Show Ribbons

    I enjoyed a great weekend in Ashe county NC with my sister for the Ashe County Piecemakers QuiltGuild annual show.  
There were about 180 quilts and I entered 2.  In the small bed applique/mixed technique category I entered my “Chopped Flowers” which is raw edge applique.  It won “Best Domestic Machine Quilting” for the show and Honorable Mention in the category. 


You can see more about the background quilting motif I used here.


   In the pieced wall-hangings category I entered my “Trapunto and 16 Patch”.  It won Second Place and Viewers’ Choice for the category. This was my first show quilt with trapunto and micro-stippling. 
This was quilted earlier than the "Chopped Flowers" and I did have some thread build up on the back at FM quilting intersections and starts and stops which I am trying to be more careful about.

    Following are photos of a couple of other winners.
Charlene W and Laurel Springs Quilting won "Best of Show" for bed quilts.
The quilting added interest and a twist to the log cabin design.

Barbara B. won "Best of Show" for art quilts and was machine applique and domestic machine quilted. 


Monday, September 15, 2014

Pines UFO Finished

   The Pines quilt is finished.  It is twin size.

I pieced the top as part of a mystery quilt project at least 6 years ago.  It waited for quilting because I wanted a special quilting motif for the neutrals and my  FMQ skill was developing.  I am pleased with the pine cone and pine bough motif.  Here is a look at part of the motif from the back of the quilt. 


  This quilt is the 10th UFO I have finished during my guild challenge.  I listed 18 UFOs at the beginning so I still have several that are still waiting for inspiration.  
     Tomorrow at guild meeting I have 3 quilts to show.  I hope members don't get tired of me showing my quilts.  I love their show and tell.

Happy Sewing and Quilting!

Friday, September 12, 2014

Making Progress Quilting

     I am happy to say that I have finally finished the FMQ of the pine cones and pine boughs in the neutral areas.  I have started FMQ a basic continuous motif in the other areas. 
I hope to have this quilt finished by guild meeting next Tuesday. 


     After quilting a few hours, I have to take a break.  I took some time to piece and quilt 3 Fall mug rugs from a couple of orphan blocks and scraps.  Mug rugs make nice small gifts. 


Thursday, September 11, 2014

Seminole Piecing

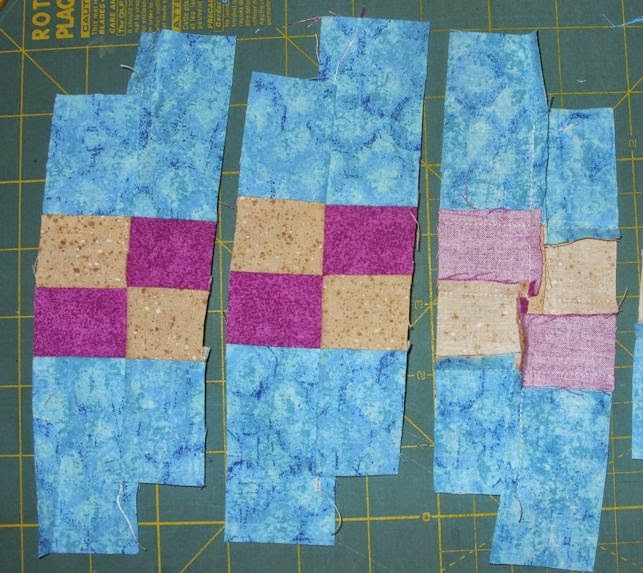
         At SQG we pieced simple step Seminole strips. This was the first time for most.  Later these strips will be joined with solid strips and other Seminole strips to form 12" quilt blocks.
Here are some photos from the day of sewing.


Tuesday, September 9, 2014

Coiled Fabric Bowl

   This morning we had a good crowd at Day Bee hosted by Mary Lou and Judy.  Jean showed this new Christmas top she pieced at the Sit and Sew last week.


    After lunch I decided to make a coiled fabric bowl.  I chose fall colors.  I may donate it for my guild silent auction next week.
I started with cotton clothesline and wrapped it with narrow strips of fabric.  Then I formed a coil and zigzag stitched it together using a 16 Jeans needle. 

After the bottom was as large as I wanted, I held it up as I added more rounds which formed the sides. 

Here is my second coiled fabric bowl. 


I have not tried anything fancy yet, like handles.  

Harlequin Seminole Band


1.     Cut strips.         2 ”  fabric A background
                          1 ½ ”    fabric B
                          1 ½ ”    fabric C
                         3 ”  fabric A background

2.    Sew the strip set with shortened stitch length since we will be slicing the seams into sections.

3.    Finger press seams A towards B, B towards C and C towards A.  (As a general rule, press strips to reduce bulk and allow for nesting seams.) Press bands gently from the right side, with enough pressure to flatten, but without stretching any bias edges.

4.    Cut pieces into 1 ½ ” segments.

5.    Pair segments, flip one and align pairs, nesting B and C.  Sew together pairs. 

                        
6.    Next align sets so the bottom seams of C nest.  Sew together. 


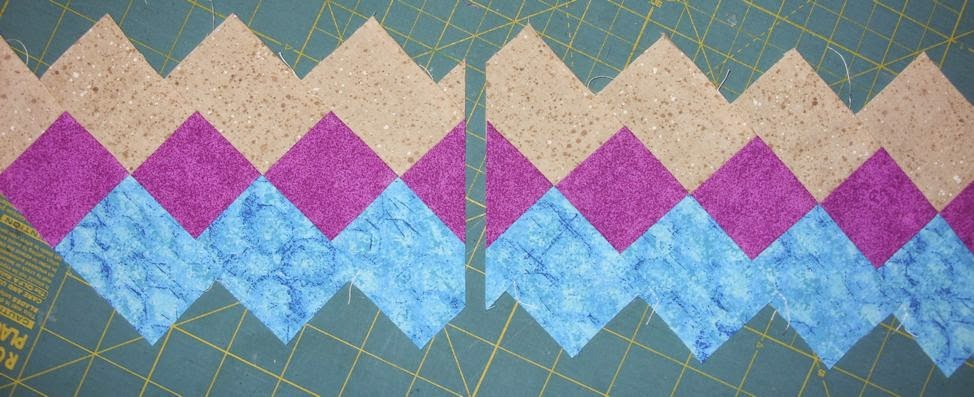
7.    Once the band is sewn together, turn it on its side so that the squares stand up on point.  At both ends add a 4 ½” half-square triangle of the spacer fabric to each end. 


8.    Trim edges leaving a seam allowance.  Band will finish at 3" high.


For narrow band to finish at 1 3/4” high, use fabric strips as follows:
  1 1/4 ”    WOF or half   fabric A
                                        1 ”    WOF or half   fabric B
     1 ”    WOF or half   fabric C
                                     1 3/4”     WOF or half    fabric A

Monday, September 8, 2014

Simple Seminole Band Tutorial

After a couple of hours of FMQ, I wanted to do some different sewing for a while.  My church quilt  group is planning to try some Seminole Piecing for our Wednesday meeting so I decided to try some.  I wrote up some instructions for 2 simple bands.

Simple Stairstep


1.     Cut strips.         2 ½” WOF or half  fabric A 
                          2”    WOF or half   fabric B
                          2 ½” WOF or half   fabric C

2.    Sew the strip set with shortened stitch length since we will be slicing the seams into sections.

3.    Press seams toward center strip.  (As a general rule, press strips to reduce bulk and allow for nesting seams.) Press bands gently from the right side, with enough pressure to flatten, but without stretching any bias edges.

4.    Cut pieces into 2” segments.

5.    Align the pieces in steps (seams should nest) and sew together. 

6.    Once the stairstep band is sewn together, turn it on its side so that the squares stand up on point.  At both ends there will be wasted angled pieces.  To maximize the usable band area, make a single slice straight up and down anywhere in the band.  Now match and sew the two angled edges together.


Another option that avoids the uneven look the first option causes.
Rather than slicing and transferring, simply add a large half-square triangle of the spacer fabric to each end. 

7.    Trim edges leaving a seam allowance.  Finishes at 2" high  finished or 2 1/2" to float depending on how closely you trim.

Carefully press bands gently from the right side, with enough pressure to flatten, but without stretching any bias edges.

For narrow band to finish at 1 ¼” high, use fabric strips as follows:
                             1 ½”   WOF or half   fabric A
                 1 ¼ ”    WOF or half   fabric B

                 1 ½”  WOF or half     fabric C


I hope you will try some Seminole bands.  I plan to add instructions for another band tomorrow and then photos from our Wednesday work.  


Saturday, September 6, 2014

New Quilter and More FMQ

    Last night I taught another Beginner Class for JoAnn Fabrics.  Because of some confusion I only  had one student but she was super.  Cindy was not a true beginner but she said it has been at least 12 years.  Here her first block is on the design wall.

Here her block is finished.  Super job!

     I have done some stabling quilting by stitching in the ditch around the neutral areas and more FMQ of pine cones and boughs.  Still more to do.

Wednesday, September 3, 2014

FMQ - Pine Cones and Pine Boughs

     I finished the binding on the tumbling block quilt and was ready to work on another project.  I am excited to say that I have finally tackled quilting a 6 year old UFO.  I looked for a long time for the right FMQ design to use in the neutral areas.  I was inspired by Lori’s tutorials for a pine cone and pine bough. 

    After practicing on paper and plastic, I started the quilting.  I did mark circles where I wanted the pinecones.  Here are my first FMQ pine cones and pine boughs. 


I have not decided what design to quilt in the dark areas, but I still have many pine cones and pine boughs to do so no hurry.

Tuesday, September 2, 2014

FMQ – Free Motion Quilting

   I spent many hours of my Labor Day holiday with FMQ.  The tumbling block quilt is almost finished.  All it lacks is the binding. 

I use a lot of charity/comfort quilts to practice new FMQ motifs or to practice FMQ control.  In the background of this quilt, I tried out a new design of circles.  It seemed to fit the fabric.   First I practice with pen and paper. 

Sorry it does not show up better in the photo. 


I simply meandered in the top plaid portion of the tumbling blocks because the quilting would not show up.  I devoted more time to quilting a feather in each of the other sections.  I just mark a spine and then FMQ the rest. 


  Here is another comfort quilt finish.  It has been a while since I meandered an entire quilt but that is what I did for this one.